

How to Solve a Super Square One Cube?

It is just like a 3x3x4 cuboid but its physical dimensions are the same as a cube.
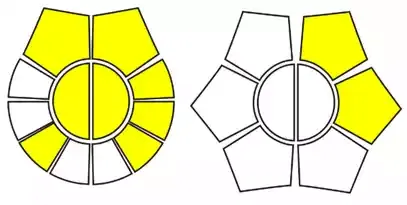
It has two circle pieces divided into two. Each half-circle piece can be rotated.
The first thing to do when it is going to be solved is to make a cube shape.
Like a 3x3x4 cuboid, there are no rotations like R, L, F and B with a single move. It has to be double each.
If we need to rotate R, L, F or B we need to keep the centre line (like an equator) along with the rotation side. There are two of each rotation.
If we rotate one time as a normal cube, as shown in the image,

e.g., if we rotate along the Right (R) centre line of the circle be kept as forward slash or backward slash (\ or /)


"Always remember R means 2R, L means 2L"
Another thing to remember is that we do not mention upper and down moves as U, D (upper, down)
We use 1,2,3 for clockwise movement and -1, -2, -3 for anti-clockwise movements
As shown in the image below. draw 3 lines 1,2,3.

If we rotate the upper layer where line 2 moves towards line 1 clockwise, it is called "1". If line 3 rotates towards line 1 and meets line 1, “2" likewise.
If it is ani-clockwise, we call them -1, -2 or -3.
We can draw a line 0 before the line 1 (to the left side)
Keep in mind:
Movements are between the TOP - BOTTOM layers and 1st - 2nd Layers only. We cannot move pieces from the top layer to 1st or 2nd layer and vice versa.
The important thing to remember is to keep the cube's cube shape intact if you have special cases like showing down to solve.
Make the cube scrambled
It will be a total mesh shown in the following image.

There is no such predefined algorithm to fix the cube shape.
There are two types of pieces. Small and big.
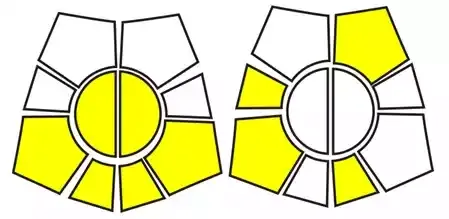
To form the cube shape, all 8 small pieces in the TOP and BOTTOM layers must be placed on the TOP layer

Keep the TOP and bottom layers as shown in the below image and rotate
Once we rotate along the front-to-back line;
It will be shown in the below image

Now hold the cube pieces as shown below image

Next, Rotate along the centre line from front to back

The bottom layer 1 (clockwise one-piece rotation)

Rotate again and it will show as the below image.

Next, the TOP and the BOTTOM layers must be adjusted as shown in the below image.
Next, the final Rotation will fix the cube shape

Likewise, the middle layers can be fixed.
Next STEP - fix Parity Issues
Fix corners - TOP/BOTTOM Layers
Just like 2x2x3 or 3x3x4 cuboid,
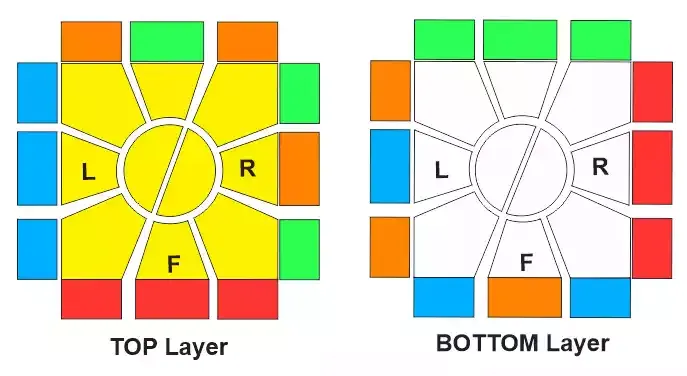
- Choose the white centre to the bottom
- check whether any of the side colours with the white side match with the white centre or not?
- If the white colour matches, two other colours of that piece should be matched with their side colours.
- E.g. White-Red-Green – if the white side is already matched with the white centre, and other colours are not, we need to fix that first

- The white-green and orange corner pieces need to match the green side of the above corner piece.
- The white-red-blue corner piece must match the red side of the above corner piece.
- Likewise, all the corners need to match correctly.
- If corners are in the same layer but have parity issues, we can move them to the TOP layer and place them back to the BOTTOM layer with the correct place or use some corner swapping algorithms to fix that by making the bottom layer as TOP layer for a while.
- Move to the TOP layer and revert to the correct positions
- Make a temporary TOP layer and use the algorithm to fix the corner issue
- Move to the TOP layer and revert to the correct positions
PRIME BOTH BOTTOM LAYERS ARE A MUST BEFORE ROTATION.
Place the imparity corner to the BOTTOM-FRONT-RIGHT corner and do
2R U 2R U’ 2R - It will move the corner to the TOP layer.
Then rotate the bottom layer until matches the corner that moves to the TOP layer.
Next, place the corner piece to the TOP-RIGHT-FRONT and do the following algorithm to fix the bottom layer right front corner.
2R U' 2R U 2R - It will move the TOP-RIGHT-FRONT corner to the BOTTOM-RIGHT-FRONT corner.
(The right-side colour of the top layer corner must match the colour of the front side of the bottom layer and the front-side colour must match the right-side colour of the bottom layer)
It will fix the corner issue, likewise do it for all imparity corners.
Make a temporary TOP layer and use the algorithm to fix the corner issue
Adjacent Corner Swapping - RIGHT side
Upside down the cube and make the bottom as top and the top as bottom.
Check whether the two corners are correctly positioned or not. If so, keep them to the left side and imparity corners to the right side
Now do the following algorithm
Prime both bottom layers
Use (2R U 2R U’ 2R) U’D’ (2R U’ 2R U 2R)
IF NO two corners are matched, do not worry place one correct corner to the FRONT-TOP-Left corner and do the above algorithms, it will make two corners matched.
Then keep two matched corners to the left and do the same algorithm once.
It will make all corners correct.
Next:
Centre Circle imparity adjustment -OPPOSITE Centre circle pieces SWAP
Prime bottom two layers
Use 2R 2U 2R 2U 2R 2U
Sometimes, after getting the Centrepieces (circles) fixed, the TOP and bottom corners will be swapped. Then use the above Method to fix that also.
If only one corner needs to be fixed and the centre pieces are also correct, use a dummy corner to bring down and then use the correct corner pieces to fix the corner and centre parity issue.
Next to Fix the TOP layer (Yellow), use the same methods used above to fix the temporary TOP layer.
Now time to fix the TOP-BOTTOM Layer edges
When we going to fix edges – consider the TOP / BOTTOM layers,
- All edges are misplaced (within the same TOP layer)
- Three edges are misplaced (3 edges within the TOP layer and the other edge is the bottom layer)
- Two edges are misplaced (2 edges within the TOP layer and the other 2 edges in are bottom layer)
- One edge is misplaced (1 edge is the TOP layer and the other 3 edges are the bottom layer)
Edges are in the same layer: We just need to swap within the same layer.
If other conditions are met, first we need to bring the same colour edges to the same layer (TOP or BOTTOM). We can easily find them in the TOP/BOTTOM layers but unfortunately, if that happens in the middle layers, we cannot find it out.
(We will discuss that layer. Because Middle layer centres are like the TOP layer edges)
One edge of the TOP layer swapped with the BOTTOM layer

We have to make another edge also swapped and that would make L shape two edges from each layer swapped to fix the all edges.
When we do the algorithm the TOP layer's right-side edge and the BOTTOM layer's left-side edge also swapped each other.
Arrange the TOP and bottom layers that will make an L shape after performing the algorithm. ( KEEP both the TOP and the BOTTOM layers as shown above image.)
Otherwise, L-shape edge swaps do not happen after the use of the algorithm.
PRIME the both Bottom layers (D' side)
2R (D' -the bottom two layers) 2R
UNPRIME the both bottom layers (D side)
PRIME Top two layers (U side)
2R 2U (Top Two Layers) 2R
UnPrime Top Two Layers - (U' side)
PRIME both bottom layers (D' side)
2R D (bottom two layers) 2R
UnPrime out the bottom two layers (D side)
PRIME Top two layers (U side)
Prime OUT Top Two Layers - (U' side)
2R (2U -Top Two Layers) 2R


- Rotate UPPER Layer imparity edges to right and back – (that need to fix edges)
- Rotate the Bottom layer imparity edges to the left and back- (that need fixed edges)
- Prime BOTTOM layer - layer that needs to be fixed (1st or 2nd)
- Unprime bottom layer - layer that needs to be fixed (1st or 2nd from the BOTTOM)
- Prime TOP layer - layer that needs to be fixed (1st or 2nd from the TOP)
- Unprime TOP layer - layer that needs to be fixed (1st or 2nd from the TOP)
- Prime bottom layer - layer that needs to be fixed (1st or 2nd from the BOTTOM)
- Unprime bottom layer - layer that needs to be fixed (1st or 2nd from the BOTTOM)
- Prime TOP layer - layer that needs to be fixed (1st or 2nd from the TOP)
- Unprime all layers


Now use the algorithm once and it will be like the below image.
Now rotate the bottom layer where the Orange edge is to the left and the Blue edge to the back – do not move the TOP layer, as shown in the below image.

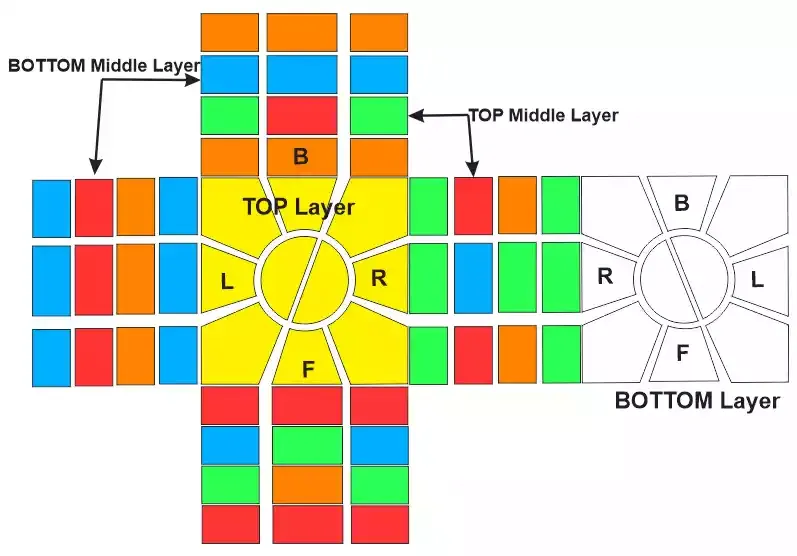
- 2nd layer Centrepieces (pieces just like edges of the TOP/BOTTOM) to the left and Front sides.
- 3rd layer Centrepieces (pieces just like edges of the TOP/BOTTOM) to the Right and Front sides.

- TOP-Middle Layer rotate Anti-Clockwise
- The bottom-middle layer rotates clockwise

- The orange piece goes to the bottom middle layer
- The green piece goes to the TOP-Middle Layer
- The Blue centrepiece of the left side of the bottom middle layer and the Red centrepiece of the right side of the top middle layer also be swapped.
- Rotate UPPER Layer imparity edges to right and back – (that need to fix edges)
- Rotate the Bottom layer imparity edges to the left and back- (that need fixed edges)
- Prime BOTTOM layer - layer that needs to be fixed (1st or 2nd)
- 2R D'2R
- Unprime bottom layer - layer that needs to be fixed (1st or 2nd from the BOTTOM)
- Prime TOP layer - layer that needs to be fixed (1st or 2nd from the TOP)
- 2R D 2R
- Unprime TOP layer - layer that needs to be fixed (1st or 2nd from the TOP)
- Prime bottom layer - layer that needs to be fixed (1st or 2nd from the BOTTOM)
- 2R
- Unprime bottom layer - layer that needs to be fixed (1st or 2nd from the BOTTOM)
- Prime TOP layer - layer that needs to be fixed (1st or 2nd from the TOP)
- 2R
- Unprime all layers

- Prime the BOTTOM Middle layer
- 2R
- U' -TOP Layer (-1, -2)
- D'-BOTTOM Layer (-1, -2)
- 2R
- -1 turn TOP and -1 BOTTOM only
- 2R
- -1, -2 TOP and -1, -2 BOTTOM only
- 2R
- -1 TOP only
- 2R
- 1,2 TOP and 1,2BOTTOM only
- 2R
- -1 (TOP and BOTTOM only)
- 2R
- U'-TOP only (-1, -2)
- D' -BOTTOM ONLY-( -1, -2)
- 2R

If this type of situation happens, we have to break the cube’s cube shape for all layers. Do the relevant algorithm without primes any layers
- 2R
- U' -TOP two Layers (-1, -2)
- D'-BOTTOM two Layers (-1, -2)
- 2R
- -1 turn TOP two layers and -1 BOTTOM two layers
- 2R
- -1, -2 TOP two and -1, -2 BOTTOM two
- 2R
- -1 TOP two only
- 2R
- TOP two layers and 1,2 BOTTOM two layers
- 2R
- -1 (TOP two and BOTTOM two)
- 2R
- U'-TOP two layers (-1, -2)
- D' -BOTOM two layers -1, -2)
- 2R

- Prime the BOTTOM Middle layer
- 2R
- U' -TOP Layer (-1, -2)
- D'-BOTTOM Layer (-1, -2)
- 2R
- -1 turn TOP and -1 BOTTOM only
- 2R
- -1, -2 TOP and -1, -2 BOTTOM only
- 2R
- -1 TOP only
- 2R
- 1,2 TOP and 1,2BOTTOM only
- 2R
- -1 (TOP and BOTTOM only)
- 2R
- U'-TOP only (-1, -2)
- D' -BOTTOM ONLY-( -1, -2)
- 2R

- 2R (U' -both TOP) (D' -both down) 2R
- Unprime both TOP (-1) and Prime both Down (1)
- 2R
- 2 x Unprime both TOP (-1, -2) and 2 x Prime both Down (1 , 2)
- 2R
- Unprime both TOP (-1)
- 2R
- 2 x Unprime both TOP (-1, -2) and 2 x Prime both Down (1 , 2)
- 2R
- Unprime both TOP (-1) and Prime both Down (1)
- 2U -both (4 pieces to backside, 2 pieces to front side -all 4 layers)
- 2R
- Prime the TOP two
- 2R
- Then adjust the top and bottom corners
- 2R
- Turn TOP two layers counter-clockwise (U')
- Turn two BOTTOM layers clockwise -U
- Prime bottom two
- 2R
No comments:
Post a Comment